

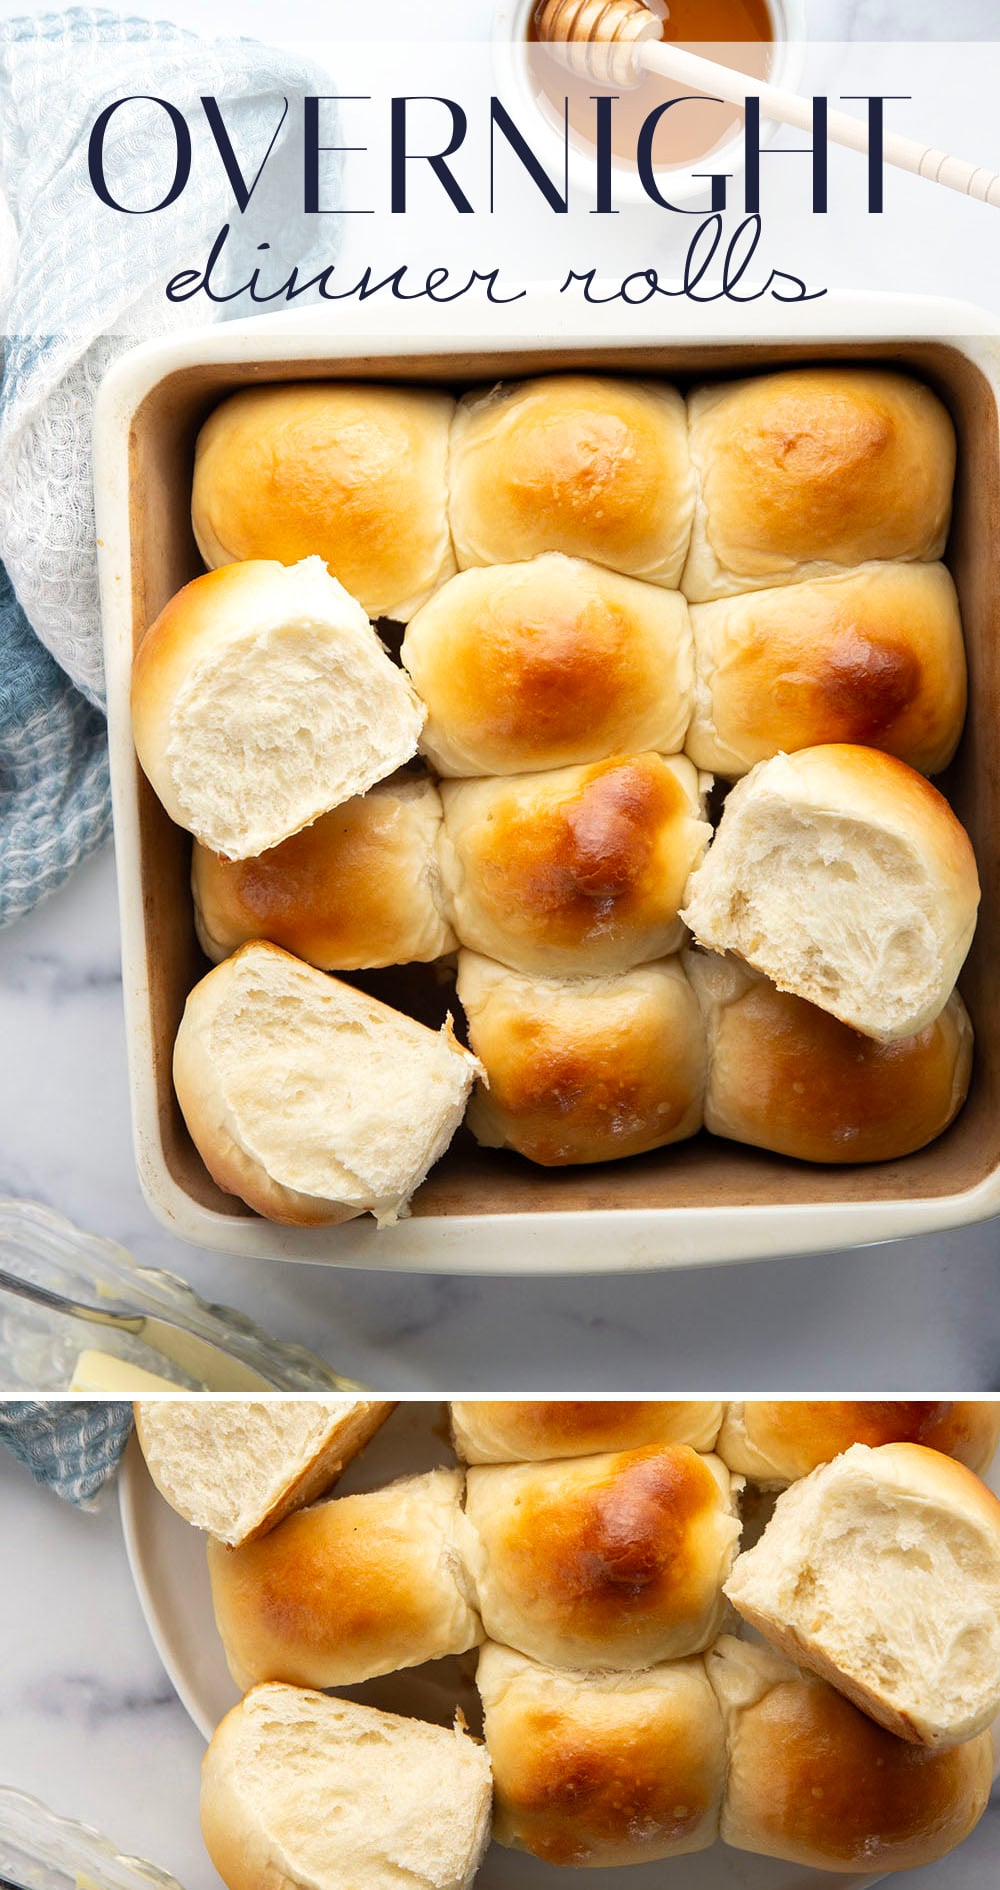
Perfect for any dinner, these pillow-soft overnight dinner rolls chill overnight in the refrigerator for easy baking the next day and their homemade flavor can’t be beat!
Dinner rolls should be a fixture for more than just holiday meals! And thanks to this overnight recipe I think you’ll quickly find that they’re easy enough for any occasion.
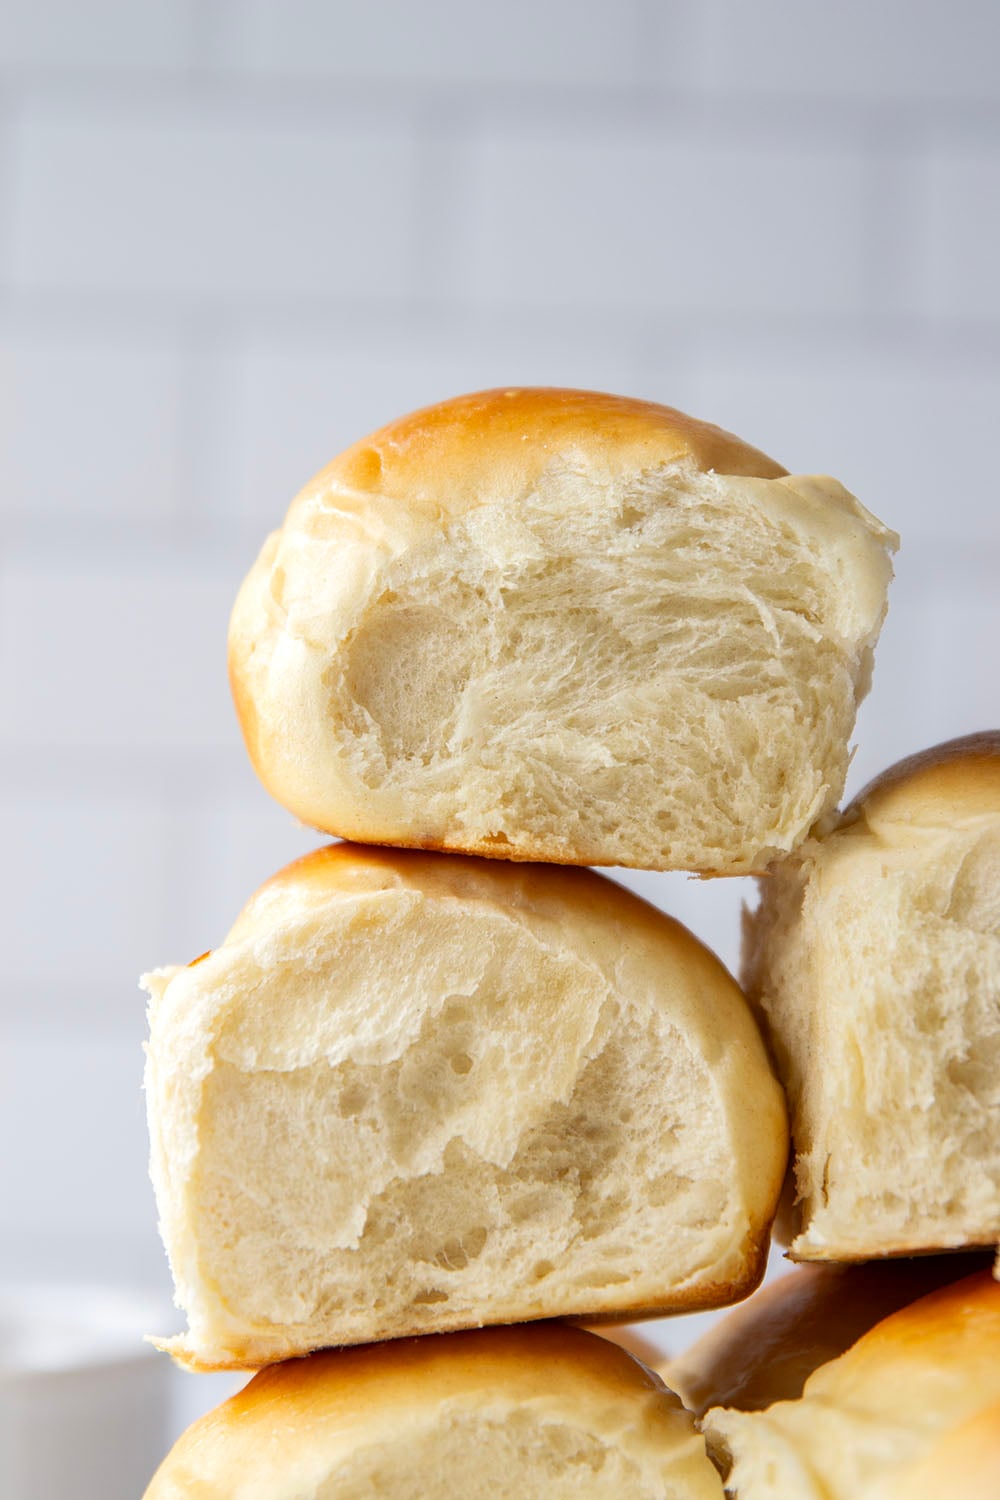
Which is a slight problem because you might feel inclined to make a meal solely out of these fluffy wonders.
If you’ve tried my overnight cinnamon rolls before you’ll recognize the procedure today for these dinner rolls. This involves a first standard rise time after mixing up the dough, shaping the dough into rolls, letting them rise overnight in the refrigerator, and then easy baking the next day whenever you’re ready for ’em!
You’re not ready for this melt-in-your-mouth goodness though, you’re just not.

These pillow-soft rolls have become a favorite in my house and truth be told, I’ve been making them for my family for years most Thursday nights to have for Friday-night dinners. Never any leftovers!
I’m so excited for you to incorporate these rolls into your own family dinner traditions!
These Dinner Rolls feature…
- A soft and fluffy texture
- A perfectly golden exterior
- Easy to proof overnight for quick baking the next day

Making the Dinner Rolls
(scroll down to the bottom of the post for the full recipe)
Ingredients You Will Need
- Active dry yeast
- Warm water
- Granulated sugar
- Egg
- Kosher salt
- All-purpose flour
- Unsalted butter
Stand Mixer vs. Mixing Bowl
Both a stand mixer and a mixing bowl + wooden spoon will work for mixing this bread. Obviously, by hand requires a little more elbow grease and arm power, but it will definitely work.
If you choose to go the stand mixer route, make sure you use the dough hook for mixing and let the machine knead the dough on medium speed 5-7 minutes until the dough is stretchy and elastic.
If you are making the dough by hand, use a large bowl and a wooden spoon for mixing the dough. For kneading, turn the dough onto a floured surface and knead about 10 minutes or whenever the dough is stretchy and elastic.

Tips for Perfect Dinner Rolls
- Use water at 110F degrees – I recommend temping the water to ensure it’s not over 110F. If you use water that is too warm, it will kill the yeast and your dough will not rise.
- Measure flour correctly – I use the spoon-and-level technique for measuring flour as this will prevent over-measuring your flour. Use a spoon to scoop flour into the measuring cup, then level with the back of a knife.
- Knead dough properly – this step is where you will develop the gluten in the dough which is crucial for forming the structure of the rolls. You can knead by hand or use your stand mixer with the dough hook attachment.
- Allow dough to rise until doubled – turn the dough into a clean greased bowl, cover with plastic wrap, and allow to rise until doubled in size, about 1 to 1-1/2 hours.
- Let dough rise in a warm place – yeast dough loves warm environments for rising. I recommend 75F-80F for a rising environment in your kitchen.
- Chill shaped rolls 8-16 hours – I recommend an 8-hour fridge rise time at minimum or up to 16 hours. Don’t let the rolls sit in the fridge longer than 16 hours otherwise they may lose their shape.
- Allow rolls to sit at room temp before baking – 30-45 minutes will bring the rolls to room temperature and get them just a little puffy for baking.
- Brush rolls with egg wash – an egg wash will give your rolls a golden sheen during baking.
Recipe Variations
Try these ideas for a different twist on these rolls.
- Add herbs – fold 1-2 tablespoons minced fresh rosemary, sage, or thyme into the bread dough.
- Top rolls with cheese – top rolls with grated Parmesan, cheddar, or asiago cheese before baking.
Storing and Freezing Rolls
These rolls store well in an airtight container at room temperature up to 4 days. For best results, I recommend reheating them in a 350F oven 8-10 minutes or individually in microwave before serving.
To freeze rolls, allow to cool completely, wrap well, and freeze up to 2 months. You can heat them straight from the freezer in a 350F oven 15-20 minutes or defrost on the counter first and then reheat.

If you’ve ever been hesitant to try your hand at homemade dinner rolls, let this be the recipe that changes your mind! You won’t find a recipe more low-stress or as good as these.
Pulling these rolls apart and unearthing the incredibly light and fluffy goodness inside is an experience like no other. Enjoying one of these warm from the oven with a pat of honey butter is otherworldly and something everyone needs in their life!
Save this recipe using the ‘save to recipe box’ button below. If you make it, please let us know! Leave a comment + star rating below, or take a photo and tag it on with #wholeandheavenlyoven.
More yeast rolls to bake up next!

Overnight Dinner Rolls
This recipe may included paid links. As an Amazon Associate, I earn a commission from qualifying purchases.
Ingredients
- 1 package (1/4 oz) active dry yeast (2-1/4 teaspoons)
- 1 cup warm water (110F)
- 1/4 cup granulated sugar
- 1 large egg, lightly beaten
- 1-1/2 teaspoons kosher salt
- 3 to 3-1/2 cups all-purpose flour (spooned and leveled)
- 2 tablespoons unsalted butter, softened
- 1 large egg white mixed with 1 tablespoon water
- Honey butter or salted butter for serving, optional
Instructions
- Place warm water in the bowl of a stand mixer fitted with a dough hook OR a large bowl. Dissolve yeast in water and let stand 5 minutes until foamy.
- Mix sugar and egg into yeast mixture until smooth. Add salt and 3 cups flour to bowl and mix on low speed OR with a wooden spoon if making dough by hand until dough pulls away from sides of bowl, about 2 minutes of mixing (if dough seems a bit wet, add additional flour by the tablespoon until dough pulls away from sides of bowl)
- Add softened butter by the tablespoon while mixer is running or fold in by hand with a wooden spoon until butter is combined in the dough.
- If making dough in stand mixer, knead dough in mixer on low speed 5-7 minutes until dough is stretchy and elastic. If making dough by hand, turn dough onto a lightly floured surface and knead by hand until dough is stretchy and elastic, about 10 minutes of kneading.
- Place dough in a greased bowl, turning once to grease top. Cover bowl with plastic wrap and let rise in a warm place at room temperature 1 to 1-1/2 hours until dough is doubled in size.
- Lightly grease a 9-inch square baking dish. Punch risen dough down and divide into 12 equal pieces. Roll each portion into smooth balls and arrange in baking dish. Cover pan with plastic wrap and refrigerate rolls 8 hours or up to 16.*
- When ready to bake rolls, remove pan from refrigerator and allow rolls to rise at room temperature 30-45 minutes until rolls are slightly puffy. Brush rolls with egg white wash.
- Preheat oven to 350F. Bake dinner rolls at 350F 25-30 minutes until rolls are a deep golden brown and register 190F on a kitchen thermometer. Cool rolls on a wire cooling rack.
- Serve rolls warm or reheated with butter if desired. Enjoy!
Notes
Nutrition
This post was updated with new recipe adjustments and photos on 10/23/25.


Jess @ Flying on Jess Fuel says
These look so perfect and fluffy!! I bet they smelled AMAZING while they were baking! So yummy.
Sarah says
The smell of these rolls baking literally swept me off my feet (from happiness obv) 😉 Thanks Jess!!
Katie @The Semisweet Sisters says
These do look like the perfect rolls to make for Thanksgiving dinner! I love overnight rolls.
Sarah says
Thanks Katie!! 🙂
Christy says
do you happen to know how much each ball of dough weighs? I always have trouble making them about the same size, or making it come out to 20 rolls, not 13 or 24!!!
Sarah says
I did not weigh the balls of dough, but I’m guessing each one was about 2-inches in size if that helps.
Sorry I’m not more help! LMK if you have any other questions!
DC says
I take the ball of dough, cut it in half, cut each half in half, then cut each of those into 5 or 6 pieces (ending up with a total of either 20 or 24 rolls). Hope that makes sense…
Sarah says
I’m thrilled to hear that these rolls are a hit with your family, DC! Thanks for letting me know. 🙂
Pat Garcia says
when you take the rolls out of the fridge the next day, do they need to worm up any, or sit at room temperature for any length of time? Thanks for sharing your wonderful recipe! I’m looking forward to trying it
Sarah says
Nope! From the fridge, the rolls can just go straight in the oven.
DC says
Hi! I’ve made these twice already (once for Christmas dinner, then for a dinner a few days later). Both times they were gobbled up and I got so many compliments from our guests. I don’t do the overnight proof since I make them the same day, but I do put them in the fridge after shaping. I let them come to room temp/rise a little before I put them in the oven, which has worked great both times. Making them yet again for a dinner we’re going to tomorrow. They are so easy, and SO delicious, just wanted to say thanks for the recipe!
Lori says
I’d love to try but only have whole wheat, whole wheat pastry or all purpose white flour. 🙁 can I sub 1/2 whole wheat and 1/2 all purpose?
Sarah says
That would be fine. You may have to add a little more flour, but just make sure that the dough is soft, not sticky.
DC says
I almost always use a combo of whole wheat and some other flour, AP, bread flour, spelt… whatever I happen to have on hand. Bread in general doesn’t turn out well with pastry flour though (something about it not developing enough gluten) so I would try to not use too much of your whole wheat pastry flour if possible.
Sarah, I’ve made these probably 10 times now, and it still stays as my family’s favorite!
Sarah says
Thanks for the info, DC! I’m so happy to hear that these rolls have become a big family-favorite! 🙂
Chandler says
I only have all purpose flour on hand! Will that work for these rolls?
Also, I notice that you used a metal baking pan, but I only have glass in 9×13. Will a pyrex work the same way?
Sarah says
All-purpose flour WILL work, however you may need to add a little more than the recipe calls for. Just make sure that the dough is smooth and non-sticky, yet soft. And yes! A glass pan will work fine.
Mirakol S. says
I pinned this recipe ages ago and just tried it this past weekend for Friendsgiving. I used melted butter instead of oil. After I took them out of the oven, there were 2 left in just 10 minutes. My batch made 23. People LOVED them! Pillowy and slightly sweet. I served them with browned butter mixed with sea salt, cinnamon and honey. SO GOOD. I’ve shared this recipe and will keep it in my repertoire! Thank you!
Sarah says
I’m SO glad to hear that these dinner rolls were a hit for your friendsgiving! Thanks for letting me know! 🙂
Philana Jeremiah says
I made these last night. I used my bread machine to whipped the dough, because I’ve never done it by hand or with the mixer. I let it rise again in the oven at the lowest temperature of the oven. I ended up getting 21 rolls. I brushed the rolls with melted butter instead of the egg. They were perfect. My family ate them all. I am making more today.
Mrs. M. says
Have you tried freezing them after they’ve risen but before cooking? Then baking them straight from the freezer?
Or do they freeze so well already baked that there’s no reason for this?
Thanks!
Sarah says
I would recommend baking these rolls before freezing them just to ensure that they rise properly. They do freeze quite well after they’ve been baked!